
Octopus GPU cluster
Octopus is a GPU cluster operated within the Faculty of Geosciences and Environment (FGSE). It has no job scheduler: users log in, pick a free node and run their jobs there, which makes it flexible but asks for some discipline. This page collects the basics to get started and to be a good neighbour.
Questions and issues
The cluster has a dedicated channel on the Geocomputing Centre Discord server, where users help each other and announce reservations. Ask a member of your group or the Centre to add you. Current node reservations and the list of users are kept in an internal note shared there.
Getting access
Accounts are created on request. Ask your PI or research group lead, who will get in touch with the Geocomputing Centre. You will then receive an email with your username and a temporary password.
Node configuration
In its current configuration the cluster has these node types:
| Nodes | Users | GPUs | GPU memory | CPUs | CPU cores | RAM |
|---|---|---|---|---|---|---|
node01–node26 | All | 4× Nvidia Titan X | 12 GB | 2× Intel Xeon E5 v3 | 6-core | 128 GB |
node27–node31 | ICE | 2× Nvidia RTX 4090 | 24 GB | 2× Intel Xeon E5 v3 | 6-core | 128 GB |
node32 | ICE + ∂AWN | 2× Nvidia RTX 6000 Pro | 96 GB | 2× Intel Xeon E5 v3 | 6-core | 128 GB |
node34 Fat | All | 1× Nvidia V100 PCIe | 16 GB | 2× Intel Xeon E5 v3 | 6-core | 1 TB |
node40 DGX | All | 8× Nvidia V100 SXM2 | 32 GB | 2× Intel Xeon Silver 4112 | 8-core | 756 GB |
node55 CPU | All | — | — | 2× Intel Xeon E5 v4 | 16-core | 512 GB |
Dedicated nodes
node27–node31 (RTX 4090) are dedicated to the ICE group (Prof. Jouvet). node32 (RTX 6000 Pro) is mostly dedicated to the ∂AWN group (Prof. Beucler) and the ICE group. Get in touch with these groups on Discord before running there.
First login
If you work remotely, establish the VPN connection to UNIL first.
Log in once with the temporary password you received and change it:
shssh <username>@octopus.unil.ch passwdEnable password-less SSH: create an
ED25519key pair and upload it to the cluster, for instance withssh-keygenandssh-copy-id. Look up how to set up password-less SSH for your platform if needed.Add an entry to your
~/.ssh/config(adapt the identity file name if yours differs):ssh-configHost octopus HostName octopus.unil.ch User <username> IdentityFile ~/.ssh/id_ed25519ssh octopusshould now land you on the login (master) node.
See Advanced SSH config to reach compute nodes directly.
General usage
Work from the work partitions
You have access to /home/<username> and to /work/<username>, /work2/<username> or /work3/<username> (a link from your home to your work directory is usually created for you). Data and all computations go to the work directories. home is reserved for scripts and small items and is not a fast filesystem.
Never compute on the login node
Always ssh to a compute node before running anything. The login node is shared by everyone and overloading it slows down the whole cluster.
Check that a node is free
There is no scheduler, so it is the users' responsibility to monitor their jobs and to avoid interfering with other users' jobs. A few tools help:
topshows CPU and memory usage of all processes on a node. It does not show GPU usage, but it shows the host side of any GPU job and its process ID.nvidia-smishows GPU utilisation and the processes running on the GPUs of the node. Its PIDs match the host-side PIDs intop.watch -d -n 0.5 nvidia-smiis handy to follow GPU usage.htopis a friendliertopwith similar information./soft/bin/wwtopshows the global cluster usage, utilisation and load per node. Insidewwtop, hitxto display GPU usage, andothenGto display the GPU driver version on each node.
Safe workflow
Look for empty or low-usage nodes with wwtop, then check CPU and host memory on that node with top or htop, and finally check GPU utilisation with nvidia-smi.
Keep a simulation running with tmux
tmux lets a session keep running on the server after you detach from it, and makes it much less likely to kill a run with a stray Ctrl+c. It is available on the cluster as tmux, and can also be installed in a conda environment with conda install conda-forge::tmux. screen, which is similar and native on the cluster, works too.
WARNING
If possible, run the tmux session on a compute node rather than on the login node, to avoid clogging the latter with extra processes.
Start a session, optionally with a name:
tmux                      # unnamed session
tmux new -s <session_name>
Then start what you need, for instance activate your environment, ssh to a node and launch a long simulation. Detach with Ctrl+b then d. You can now disconnect and shut down your computer.
To come back, log in to octopus again, do not connect to a node, and attach:
tmux list-sessions          # which sessions are running
tmux attach                 # reattach the last one
tmux attach -t <session_name>
To end a session, attach to it and run tmux kill-session.
VS Code over SSH
VS Code can connect to the cluster with the Remote-SSH extension.
WARNING
This is convenient but can leave many processes running on the login node. Three habits avoid clogging it.
Work from a project folder, never from the filesystem root. Open a specific project directory with "File → Open folder", avoiding
/workor/work2themselves. This reduces the number of files VS Code watches. From a terminal on octopus you can alsocdto the folder and runshcode -r .to restart VS Code in that directory.
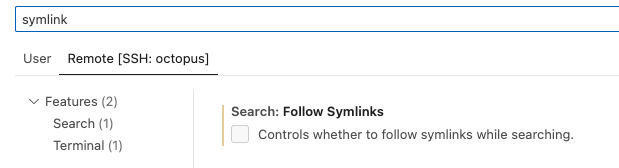
Unset "follow symlinks". Open the preferences or the command palette, search for "symlink" and deactivate the option for the "Remote [SSH: octopus]" target.
Kill and restart the VS Code server from time to time. Open the command palette, type
kill vs code serverand apply it, then reconnect as usual.
Advanced SSH config
A wildcard entry in your SSH config gives direct access to any compute node, using the password-less access to the login node as a proxy jump:
Host node*
  HostName %h.octopoda
  User <username>
  ProxyJump octopus
Replace the username and adapt the proxy jump name to the host alias you chose in First login.
To open VS Code directly on a free compute node, open the command palette and type connect to host:

The wildcard is not in the list, so type the node name yourself, for instance node04:

Hit enter, select Linux and accept the key fingerprint if asked. After the server setup you have VS Code running on the compute node.
INFO
Clean up when you leave the node by killing the VS Code server there.
Python environments
Anaconda
Python and conda are available through an Anaconda3 install under /soft/anaconda3 (Anaconda3-2019.10, Python 3.7.4). The base environment includes torch and torchvision. tensorflow and keras are installed in the tf-gpu environment, which has not been tested.
To use it, source or add to your .bashrc:
# >>> conda initialize >>>
# !! Contents within this block are managed by 'conda init' !!
__conda_setup="$('/soft/anaconda3/bin/conda' 'shell.bash' 'hook' 2> /dev/null)"
if [ $? -eq 0 ]; then
    eval "$__conda_setup"
else
    if [ -f "/soft/anaconda3/etc/profile.d/conda.sh" ]; then
        . "/soft/anaconda3/etc/profile.d/conda.sh"
    else
        export PATH="/soft/anaconda3/bin:$PATH"
    fi
fi
unset __conda_setup
# <<< conda initialize <<<
Micromamba
Another way to manage Python environments is micromamba, keeping the environments on the fast work filesystem:
- Create the folder
/work/<username>/.micromamba. - Run
/soft/micromamba/bin/micromamba shell init /work/<username>/.micromamba. - Source your
.bashrc. - Run
micromamba activate. - Test the install by adding a package and checking that it lands in
/work/<username>/.micromamba.
Software and modules
Spack, modules and the installation of new software are not documented yet. Ask on Discord in the meantime.